Optimizing Performance: A 2024 Updated Guide to Setting Up Caching in Laravel
Laravel is an excellent framework for those who want to use PHP. It pairs well with other languages, offers clean code, and includes features for a full-stack application out-of-the-box.
One of those features is caching. Laravel includes an elegant, comprehensive caching system designed to be highly flexible, allowing developers to choose from various caching drivers and strategies, tailoring the caching solution to fit their applications' specific needs and architecture.
This adaptability ensures that Laravel applications remain scalable, responsive, and efficient, regardless of complexity or user base size.
This article will thoroughly explore Laravel caching, examine the various cache configurations available in Laravel, and discuss the reasons for utilizing Readyset. So, let's begin.
Caching Options in Laravel
Laravel has a robust caching system that supports various drivers, facilitating seamless caching implementation.
The configuration of caching in a Laravel application is managed in the .env file. To change the caching option, modify the CACHE_DRIVER value in .env to your preferred caching driver. By default, it's set to file. You can find all supported caching options in config/cache.php.
File
File caching stores cache data in your computer's file system. It offers a simple, disk-based caching mechanism suitable for smaller applications but may not be optimal for larger ones. To use file caching, add to your .env:
CACHE_DRIVER=fileArray
The array cache driver stores data in a PHP array. This non-persistent method is suitable for request-based caching, especially during application testing. To use it, set in your .env:
CACHE_DRIVER=arrayDatabase
Database caching stores cache data in a database table, ideal for applications needing database-driven caching. First, create a cache table using:
php artisan cache:tableThen, run migrations:
php artisan migrateFinally, update your .env:
CACHE_DRIVER=databaseMemcached
Memcached is a memory caching system for distributed caching environments. Install the Memcached PECL package, ensure Memcached is installed and running on your server, and set in your .env:
CACHE_DRIVER=memcachedRedis
Redis offers advanced key-value store caching with data persistence and high performance. Install the Redis server and the PhpRedis PHP extension via PECL or the predis/predis package (e.g., composer require predis/predis "^1.1") via Composer. Then, update your .env:
CACHE_DRIVER=redisDynamoDB
For DynamoDB caching, create a table in AWS DynamoDB and note its name. Install the AWS SDK for PHP via Composer (composer require aws/aws-sdk-php), set AWS credentials (AWS_ACCESS_KEY_ID, AWS_SECRET_ACCESS_KEY, AWS_DEFAULT_REGION) in your .env file, update config/cache.php with DynamoDB details, and set:
CACHE_DRIVER=dynamodbOctane
Laravel Octane enhances performance significantly and can be used for caching. Install Octane via composer require laravel/octane, choose a caching backend like Swoole Table or Redis, update config/cache.php to set 'octane' as the default cache driver, and configure your .env:
CACHE_DRIVER=octaneStart Octane with php artisan octane:start.
Null
The null cache driver effectively disables caching, useful in specific environments or during development/testing when caching interference is undesirable. Set in your .env:
CACHE_DRIVER=nullConfiguring Cache Settings
For further customization and configuration of cache-related settings, modify the config/cache.php file. This file allows for additional settings specific to each caching driver and the overall caching strategy of your application.
Laravel Cache Methods
Laravel offers a versatile range of caching methods, allowing for the easy implementation of various caching strategies. Here's an explanation of these methods, organized by functionality:
Storing Data in Cache Methods
Cache::put()
This function stores data in Laravel's cache. It requires a key, the value to be stored, and an optional duration (in seconds) for how long the data should be kept. If the duration is not specified, it uses the default duration from config/cache.php:
Cache::put('key', 'value', 60); // Stores 'value' under 'key' for 60 seconds.Cache::putMany()
Similar to Cache::put(), this function allows caching of several items simultaneously with a shared expiration duration:
Cache::putMany(['data1' => 'value1', 'data2' => 'value2'], 30); // Stores 'value1' and 'value2' for 30 seconds.Cache::remember()
This method checks for the specified key in the cache. If not found, it executes the provided closure function to obtain data, caches the result, and returns it. This is useful for reducing database queries:
$value = Cache::remember('key', 60, function() {
    return 'data'; // Data retrieval logic
});
Cache::forever()
Cache::forever() is used to store data in the cache indefinitely, ideal for rarely changing data:
Cache::forever('key', 'data');Retrieving and Managing Cached Data
Cache::get()
Retrieves the value for a specified key. If the key does not exist, it returns null or a default value if provided:
$data = Cache::get('key', 'default-value');Cache::many()
Fetches multiple cache items using an array of keys and returns an array of values:
$data = Cache::many(['key1', 'key2']);Cache::forget()
Cache::forget() removes a specific item from the cache, useful for invalidating cache entries:
Cache::forget('key');Cache::flush()
Cache::flush() clears all cache data. Use with caution as it removes everything stored in the cache:
Cache::flush();Adjusting Cached Values: Increment and Decrement
To increment or decrement cached values, use Cache::increment() and Cache::decrement():
Cache::increment('key');
Cache::decrement('key');
Advanced Features
Cache::lock()
For handling race conditions, Laravel offers atomic locks using Cache::lock(). This is an advanced feature useful in specific scenarios.
While there are more methods available in Laravel's cache system, the ones mentioned above are among the most widely used. For a comprehensive list, refer to Laravel's official cache documentation.
Useful Laravel Cache Commands
Laravel provides several commands through artisan to simplify cache management. Below are some of these essential commands:
Clear Laravel Cache
To clear the application cache before it expires, especially useful in development, use:
php artisan cache:clearThis command removes all items from the cache.
Clear Route Cache
Laravel caches the application routes for improved performance. To clear this route cache:
php artisan route:clearAnd to cache the routes, which is advisable in production for faster route registration:
php artisan route:cacheClear Config Cache
When you change config files and need to refresh the cached configuration, use:
php artisan config:clearThis is especially important after deploying changes in a production environment.
Clear Compiled Views
Compiled view files can be cleared with:
php artisan view:clearUseful when updating views and needing to force Laravel to recompile them.
Clear All Cache
For a comprehensive cache clearing that includes cache, route cache, view cache, and compiled services, use:
php artisan optimize:clear
This command is particularly helpful during deployments to ensure all cached elements are refreshed. Each of these commands plays a crucial role in efficiently managing cached data and ensuring the smooth operation of a Laravel application.
Why Readyset?
Caching is a widely adopted technique used to enhance data retrieval speed. It works by storing the results of data requests in memory. This way, when that same data is required again, it can be quickly fetched from memory instead of being reprocessed.
However, caching isn't without its challenges. One of the primary issues is managing the cache effectively. This involves updating the cache regularly and removing (or invalidating) cached data when it's no longer accurate or relevant.
Readyset is a specialized SQL caching tool designed to enhance database performance. It stands in the middle of your application and your MySQL or PostgreSQL database and caches data.
Here's a simple breakdown of how Readyset works:
- Unique Approach: Unlike typical caching methods, Readyset employs a dataflow graph technique. This means it automatically updates cached data whenever new information is added to your primary database.
- Seamless Integration: After capturing an initial image of your database, Readyset positions itself as a secondary database. This allows it to continuously receive and incorporate new data directly from your main database server.
- Protocol Compatibility: Readyset is compatible with both MySQL and PostgreSQL protocols. This compatibility means you can connect your application straight to Readyset without major adjustments. If Readyset encounters a query that it hasn't cached, it simply forwards this query to your main database to ensure consistent and accurate data retrieval.
Using Readyset With Laravel
To get started using Readyset in a Laravel project, you need to
- Install Readyset on your machine or server
- Connect to Readyset
- Cache Queries
- Configure your Laravel application database to connect to Readyset
Now we know what to do, let's get started with the implementation.
Install Readyset
We need a database to connect to. For this tutorial, we will use an employee sample database. To follow along, you can find the steps to download and install it on GitHub.
The recommended approach to install Readyset is through Docker. Ensure that you have Docker installed globally. Next, download the Readyset Docker image from the Docker hub using the command below
docker pull readysettech/readysetAfter downloading the image, you need your primary database credentials to start Readyset. Your credentials should be in this format:
mysql://<username>:<password>@<host>:<port>/<db_name>Let's start Readyset as a root user with a password of password and connect to the employee database we downloaded above.
docker run -d -p 3307:3307 -p 6034:6034         \
--name readyset                                 \
-e UPSTREAM_DB_URL=mysql://root:password@host.docker.internal:3306/employees \
-e LISTEN_ADDRESS=0.0.0.0:3307                  \
readysettech/readyset:latest
This will start up Readyset. You can confirm that Readyset is running from your Docker console by looking at the Log of the Readyset docker container. Your screen should be similar to the image below
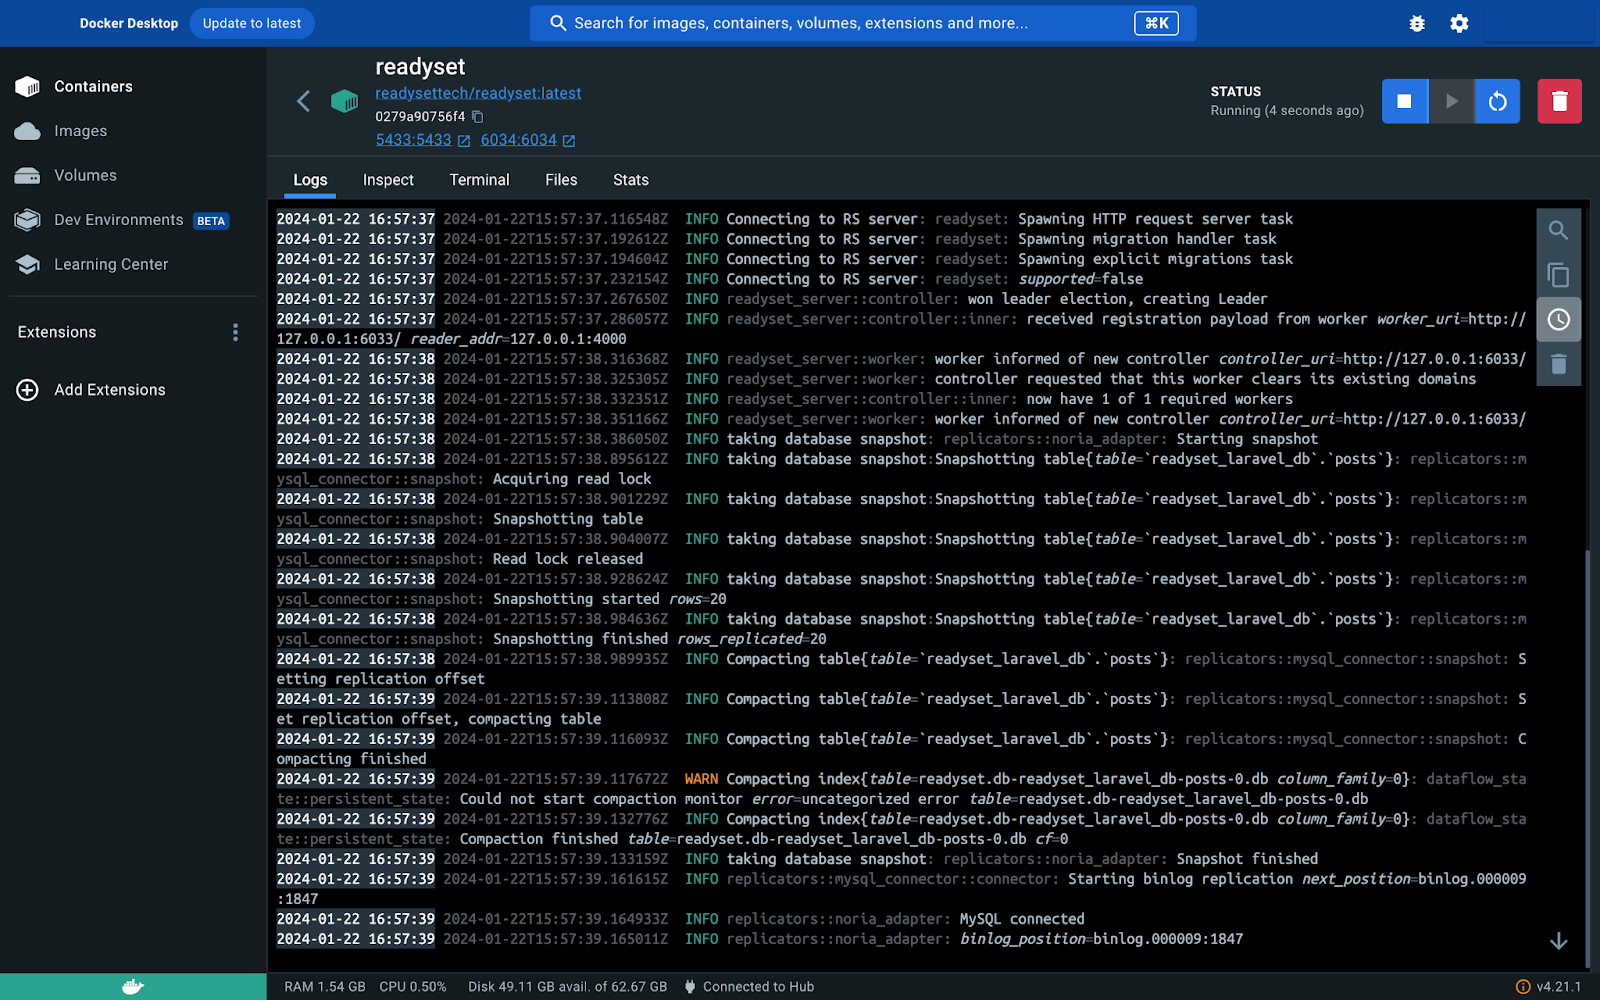
You can also confirm this in the terminal using the command below
docker logs readysetNote: Your Database user would require a password to connect to Readyset. MySQL or Postgres users without passwords would not work. If your database runs locally, use host.docker.internal not localhost for the connection.
For a more detailed guide on installing Readyset, visit the Readyset documentation.
Connect to Readyset
We can connect to Readyset the same way we would connect to MySQL using the terminal. Readyset uses a different port number 3307. MySQL uses port 3306 by default. This is the only significant difference in the connection process. Now let's connect to Readyset using the same details as the root user above.
mysql -u root -p password -P 3307Verify that you are connected using the command below:
mysql> SHOW READYSET TABLES;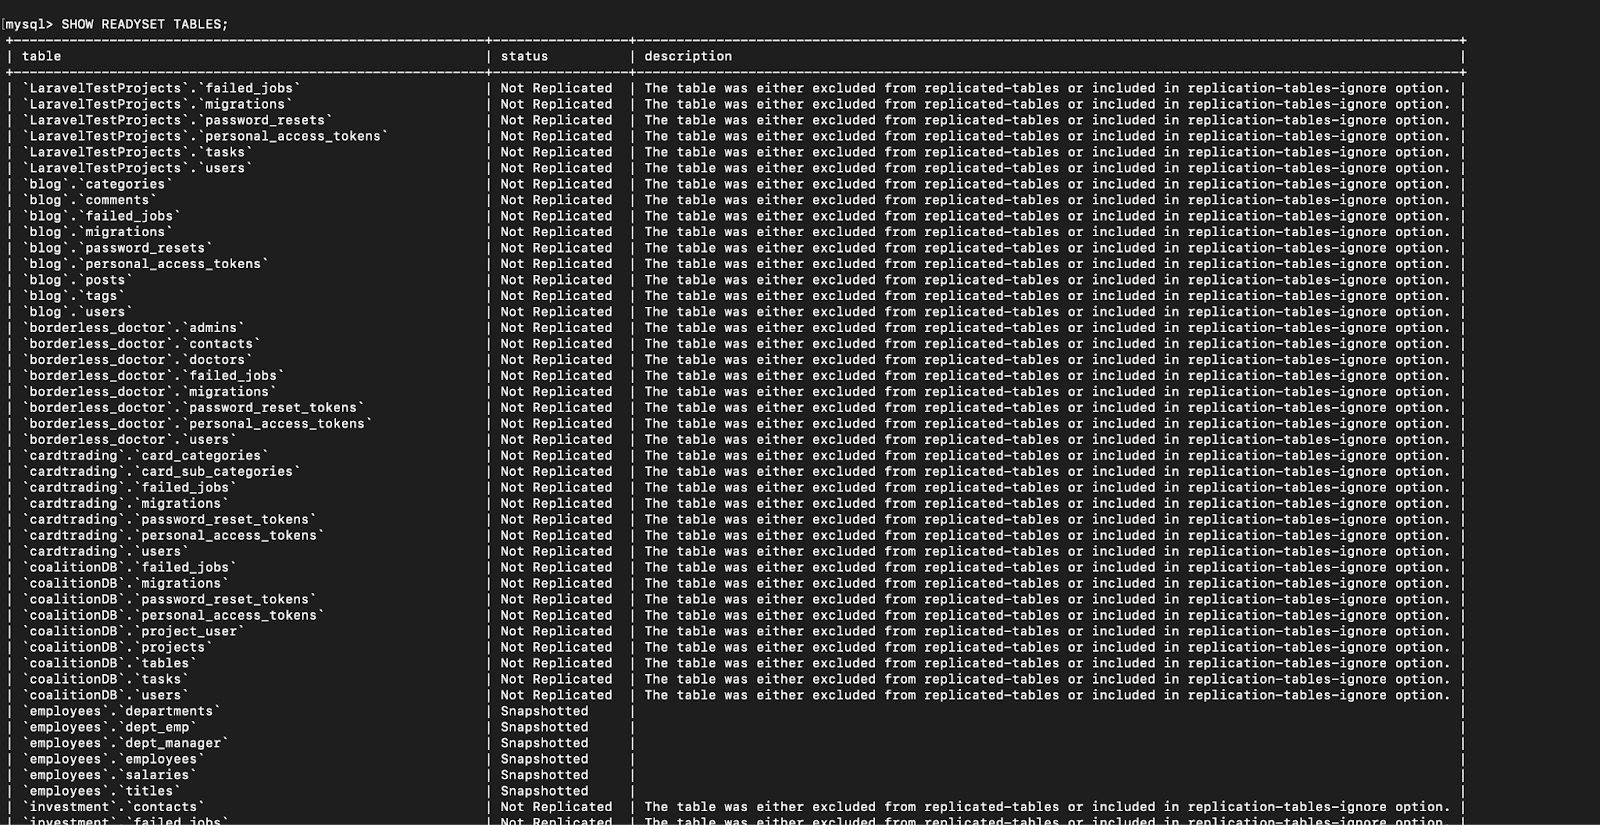
The tables with the status of `snapshotted` can now be cached using Readyset.
Create Cache
To cache using Readyset, we first run a query one time, check that the query is cacheable by Readyset, then create cache for the query. To get started, let's run a simple query to count how many employees earn 100,000:
mysql> SELECT COUNT(*) FROM employees.salaries WHERE salary = 100000;
Notice that the request took 0.44 seconds to complete. Next, let's ensure that the query is cacheable by Readyset using this command:
mysql> SHOW PROXIED SUPPORTED QUERIES;
Let's create our cache by adding CREATE CACHE FROM to the query and then run the query after caching to verify it works:
mysql> CREATE CACHE FROM SELECT COUNT(*) FROM employees.salaries WHERE salary = 100000;When this command runs, repeat the select query to see how fast it runs:
mysql> SELECT COUNT(*) FROM employees.salaries WHERE salary = 100000;
Now it takes only 0.03 seconds to run the same command that took 0.44 seconds to run earlier.
Readyset Caching With Laravel
Now we have Readyset installed, let's take the implementation a step forward by implementing caching in a simple Laravel API using Readyset.
Remember that Readyset sits between your MySQL database and your application. To see Readyset in action, we will execute the request we already created a cache for earlier: SELECT COUNT(*) FROM employees.salaries WHERE salary = 100000; in our Laravel API and measure the response time when our database is connected to Readyset and when it is not.
To get started, let's create a new Laravel project using the composer command below:
composer create project laravel/laravel Readyset_Laravel_CachingOnce the project is created, connect your application to your database. In your .env file, add your database credentials like the ones below:
DB_CONNECTION=mysql
DB_HOST=127.0.0.1
DB_PORT=3306
DB_DATABASE=employees
DB_USERNAME=<username>
DB_PASSWORD=<password>
API Route
The next step would be to create a route for the request. Navigate to routes/api.php file and add the following:
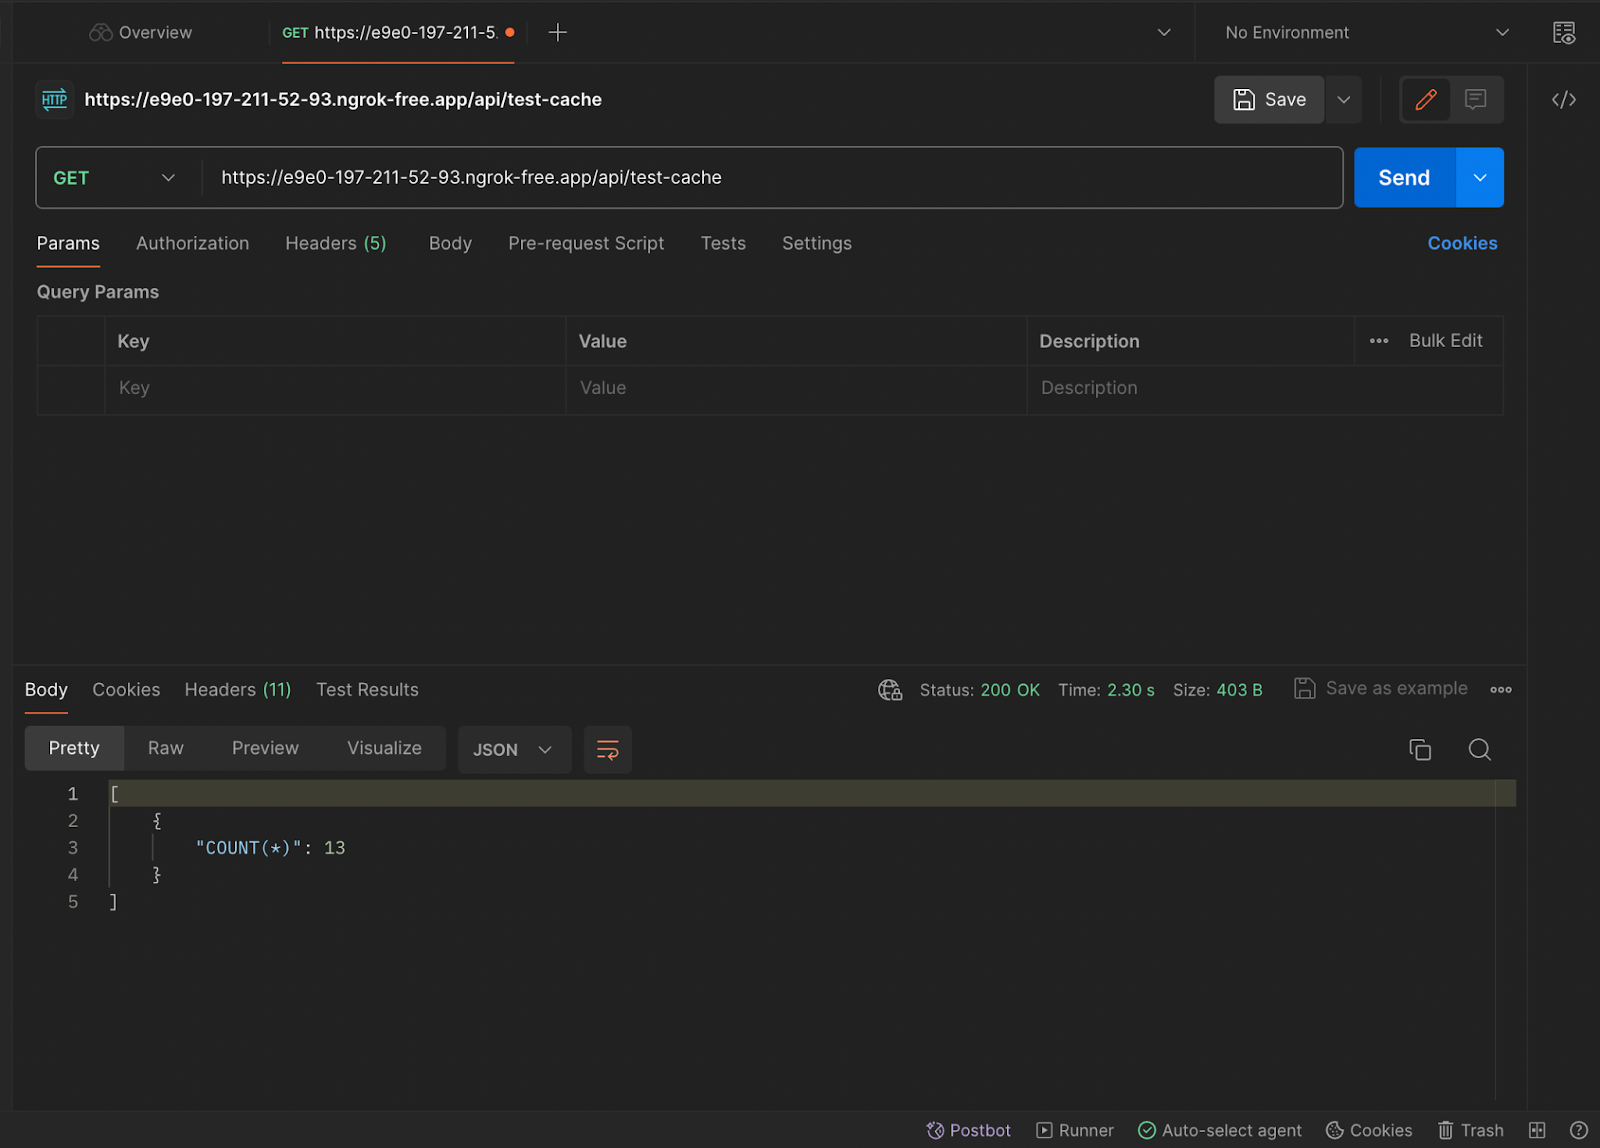
Route::get('/test-cache', function () {
    $employees = (DB::select('SELECT COUNT(*) FROM employees.salaries WHERE salary = 100000'));
    return response()->json($employees);
});
Testing the API
Now let serve our API and compare the response time of the running the request when caching with Readyset and when not.
Serve the application using the command below:
php artisan serveRequest Without Cache
To test the application, you can use any API client you prefer. If you find it difficult to expose your endpoint to the internet for testing, I suggest using Ngrok. If you're unfamiliar with Ngrok, here's a useful tutorial to help you set it up.
Response time of request without caching.
Request With Readyset Cache
As Readyset caches SQL results, you can add it to Laravel via the database setup rather than through the CACHE_DRIVER.
Connecting to Readyset can be done simply by changing the port number of your database connection in the env file from DB_PORT=3306 to DB_PORT=3307. Let's do that using the code below:
DB_CONNECTION=mysql
DB_HOST=127.0.0.1
DB_PORT=3307
DB_DATABASE=employees
DB_PASSWORD=<username>
DB_USERNAME=<password>

Easily Manage Caching in Laravel With Readyset
Laravel developers are spoiled with caching options. From simple file caching through to DynamoDB, you can find a caching solution for any situation. Add to that, the caching API is easy to use and understand.
But you are still stuck with managing that cache and all the headaches that go with it. Readyset removes those headaches and makes it easy for laravel developers to incorporate SQL caching into their applications with zero code changes. Here, we got our hands dirty with the code by:
- Installing and running Readyset using Docker
- Creating a simple API in Laravel
- Seeding our database
- Connecting our database to Readyset, and implementing caching
Feel free to experiment with the code as much as you can and share your experience with the rest of the community. If you are interested in using Readyset, you can sign up here.